Difference between revisions of "LC-PI-V3S"
(Created page with "=='''Product name'''== LCPI-PC-V3S_V1.2 Allwinner V3S development board driving recorder solution data open source.<br> =='''Introduction'''== File:V3S 01-1.jpg<br> F...") |
|||
| (2 intermediate revisions by the same user not shown) | |||
| Line 34: | Line 34: | ||
1.Program burning<br> | 1.Program burning<br> | ||
(1)Decompress and install the burning tool<br> | (1)Decompress and install the burning tool<br> | ||
| + | [[File:V3S 03.jpg]]<br> | ||
| + | |||
| + | Burn: Open the installed PhonixSuit<br> | ||
| + | [[File:V3S 04.jpg]]<br> | ||
| + | |||
| + | Click "一键刷机" --> "预览" to select the img file to be burned and select format; then plug the USB cable into the OTG interface and connect it to the computer. Press and hold the S6 button and then press the RESET button. Release the S6 button and start burning<br> | ||
| + | [[File:V3S 05.jpg]]<br> | ||
| + | |||
| + | [[File:V3S 06.jpg]]<br> | ||
| + | |||
| + | [[File:V3S 07.jpg]]<br> | ||
| + | The burning time is about one minute, please be patient. The firmware is burned in Flash. | ||
| + | |||
| + | |||
| + | |||
| + | |||
| + | =='''Function test'''== | ||
| + | The device uses microUSB or type-c power supply,and then uses the usb to ttl module to connect to the U0T,U0R and GND pins,then open putty,and wait for the boot to complete<br> | ||
| + | [[File:V3S 08.jpg]]<br> | ||
| + | |||
| + | [[File:V3S 09.jpg]]<br> | ||
| + | |||
| + | [[File:V3S 10.jpg]]<br> | ||
| + | |||
| + | Login username, root password is empty<br> | ||
| + | [[File:V3S 11.jpg]]<br> | ||
| + | |||
| + | |||
| + | Next are the instructions for each function<br> | ||
| + | 1.Button detection Enter key and press Enter,press S1 to S4 respectively to detect,press Ctrl+C to exit the key detection function,Ctrl+Z to pause<br> | ||
| + | [[File:V3S 12.jpg]]<br> | ||
| + | |||
| + | [[File:V3S 13.jpg]]<br> | ||
| + | |||
| + | |||
| + | 2.Insert the TF card into the TF card holder, and the serial port will return sd init ok<br> | ||
| + | [[File:V3S 14.jpg]]<br> | ||
| + | |||
| + | |||
| + | 3.Wired network Plug in the network cable and enter ifconfig eth0 up and press Enter udhcpc -i eth0 and press Enter<br> | ||
| + | After the network connection is successful, enter ping baidu.com and press Enter to test the Internet access function<br> | ||
| + | [[File:V3S 15.jpg]]<br> | ||
| + | |||
| + | |||
| + | 4.Recording Enter cd /tmp and press Enter amixer cset numid=10,iface=MIXER,name='Audio main mic' l press Enter<br> | ||
| + | arecord -d 3 -f S16_LE -r 16000 tmp.wav Press Enter, wait for "#" to display after recording, indicating that the recording is complete<br> | ||
| + | [[File:V3S 16.jpg]]<br> | ||
| + | |||
| + | |||
| + | 5.Audio playback amixer cset numid=1,iface=MIXER,name='Master playback volume' 63 Enter amixer cset numid=17,iface=MIXER,name='Speaker Function' 0 Enter<br> | ||
| + | aplay tmp.wav Press Enter,plug in the headphone cable with 3.5mm plug or the playback device to hear the sound you just recorded<br> | ||
| + | [[File:V3S 17.jpg]]<br> | ||
| + | |||
| + | |||
| + | 6.WIFI wireless network input ifconfig wlan0 up enter, then enter vi/etc/wpa_ Supplicant.conf Fill in the router's ssid and password<br> | ||
| + | [[File:V3S 18.png]]<br> | ||
| + | |||
| + | Then execute the wifi link command and get the dynamic ip through udhcpc to connect to the network wpa_supplicant -D nl80211 -i wlan0 -c /etc/wpa_supplicant.conf -B Enter | ||
| + | udhcpc -i wlan0 Enter ping baidu.com Enter<br> | ||
| + | [[File:V3S 19.png]]<br> | ||
| + | |||
| + | |||
| + | 7.The screen is full of random color dots. Before executing the command that the screen is full of random color dots, kill the application process of pathstroke. Enter ps and press Enter. You can see many processes. For example, pathstroke is the 139th,you can enter Kill 139 Enter the end (it is not necessarily 139 every time you restart the device),the circle on the display stops moving<br> | ||
| + | [[File:V3S 20.png]]<br> | ||
| + | |||
| + | [[File:V3S 21.jpg]]<br> | ||
| + | |||
| + | Finally, enter cat/dev/urandom>/dev/fb0 Enter<br> | ||
| + | [[File:V3S 22.jpg]]<br> | ||
| + | |||
| + | |||
| + | 8.Camera If the pathstroke has not been killed,you need to kill the AR0330 camera before opening the camera command,reset the device,wait for the boot to complete the root login and enter demo-camera Press Enter,and the image can be seen on the display<br> | ||
| + | [[File:V3S 23.jpg]]<br> | ||
| + | |||
| + | =='''Instructions for use LcPiTester_V3S soft'''== | ||
| + | The following is the test method using Putty general software. For customers who want to speed up the test,they can use the V3S special test software developed by LC Technology,as shown in the figure below:<br> | ||
| + | [[File:V3S 24.png]]<br> | ||
| + | |||
| + | Instructions for use:<br> | ||
| + | 1.Connect the peripherals that need to be tested (such as LCD),connect the serial ports (GND,U0T,U0R),and supply power to the board<br> | ||
| + | 2.Select the correct port number,baud rate 115200,click "连接",and a lot of debugging information will be printed out in the window at this time. After the system startup is complete,click "断开",and then click "连接",and the following information will appear Log in to the Linux system successfully,and the function test can be performed<br> | ||
| + | [[File:V3S 25.png]]<br> | ||
| + | |||
| + | ''Remarks: The software only supports ports within COM9. If the port number recognized by the computer exceeds COM9,please modify the port number in the Windows Device Manager.''<br> | ||
| + | |||
| + | Take the test LCD as an example:<br> | ||
| + | 1.Check "随机色点",click "执行",if the test is successful,the LCD will be covered with random color dots<br> | ||
| + | [[File:V3S 26.png]]<br> | ||
| + | |||
| + | [[File:V3S 27.jpg]]<br> | ||
| + | |||
| + | 2.At this time,the software will ask whether the test is successful. If you click "是",the random color point will display green[[File:V3S 28.png]]otherwise it will display red. The test method for the rest of the functions is similar to this<br> | ||
| + | |||
| + | |||
| + | |||
| + | |||
| + | =='''Source code compilation'''== | ||
| + | 1.Install the virtual machine VMware Workstation (in the sn.txt in the activation code installation package)<br> | ||
| + | [[File:V3S 29.png]]<br> | ||
| + | |||
| + | |||
| + | 2.Unzip the CherryPi_V3S-Build-2020-07-14.7z file<br> | ||
| + | |||
| + | |||
| + | 3.Open the installed VMware Workstation software, click "Open Virtual Machine", and locate the newly decompressed the CherryPi_V3S.vmx file in the folder CherryPi_V3S is enough.<br> | ||
| + | [[File:F1C200S-38.png]]<br> | ||
| + | |||
| + | [[File:V3S 31.png]]<br> | ||
| + | |||
| + | |||
| + | 4.Then click the green play icon on the left or in the menu bar "Start this virtual machine"<br> | ||
| + | [[File:V3S 32.png]]<br> | ||
| + | |||
| + | ''Remarks:'' | ||
| + | The processor parameters here may need to be changed according to the computer parameters you actually use, such as a 4-thread CPU,Then the parameter behind the processor is changed to 4.<br> | ||
| + | The interface after entering is as follows<br> | ||
| + | [[File:V3S 33.png]]<br> | ||
| + | |||
| + | |||
| + | 5.Click the folder icon, enter Home-->>V3S-->>lc-v3s-sdk<br> | ||
| + | [[File:V3S 34.png]]<br> | ||
| + | |||
| + | Right-click in this folder and click "Open in Terminal"<br> | ||
| + | [[File:V3S 35.png]]<br> | ||
| + | |||
| + | |||
| + | 6.Enter ./build.sh and press Enter to compile the V3S source code<br> | ||
| + | [[File:V3S 36.png]]<br> | ||
| + | |||
| + | |||
| + | |||
| + | |||
| + | =='''Download LCPI-V3S user manual'''== | ||
| + | For more information on the use of LCPI-V3S, please click[https://drive.google.com/drive/folders/1mnGFmI427aeV6bKpRa9Xz_Ek0GerLGIE?spm=a2g0o.detail.1000023.1.60faHjOGHjOGW7 Google Drive Link] | ||
Latest revision as of 11:14, 23 November 2023
Contents
Product name
LCPI-PC-V3S_V1.2 Allwinner V3S development board driving recorder solution data open source.
Introduction
Overview
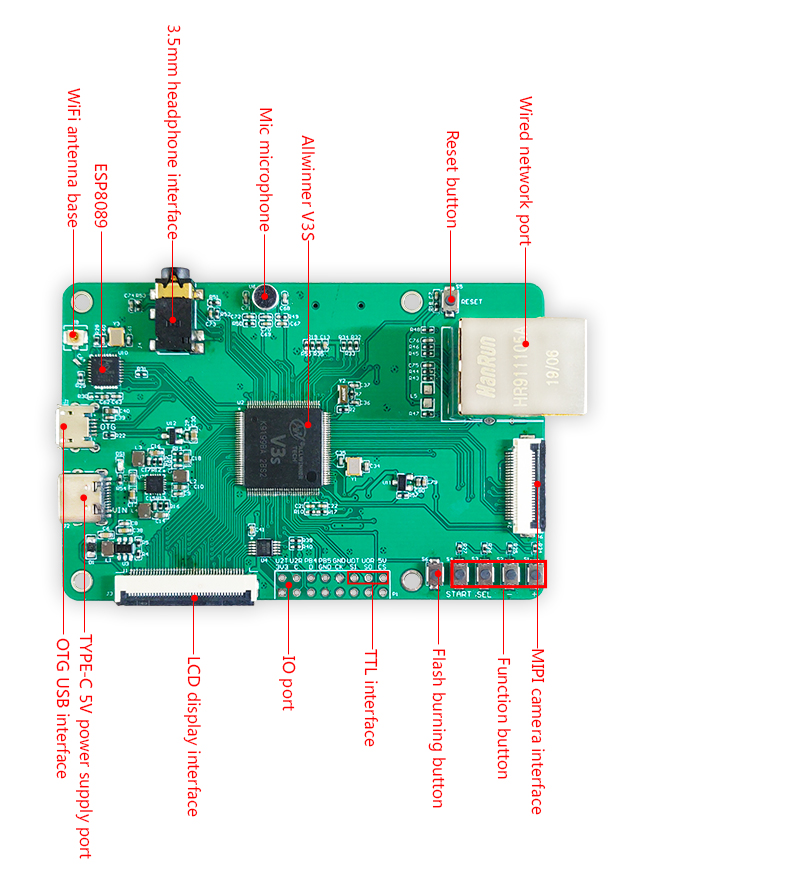
LCPI-PC-V3S is equipped with Allwinner V3s chip.Allwinner V3s is a car-grade SoC with built-in ARM Cortex A7 CPU and integrated 64MB DDR2 RAM.Allwinner V3S Soc has high performance,full functions,and cost-effective High,can realize the development board of various DIY products,facilitate the integration of opencv,realize face recognition,and the board is equipped with a variety of interfaces
Function
- CPU:ARM Cortex-A7,maximum frequency 1.2G
- DRR2:SoC integrated 512Mbit DDR2
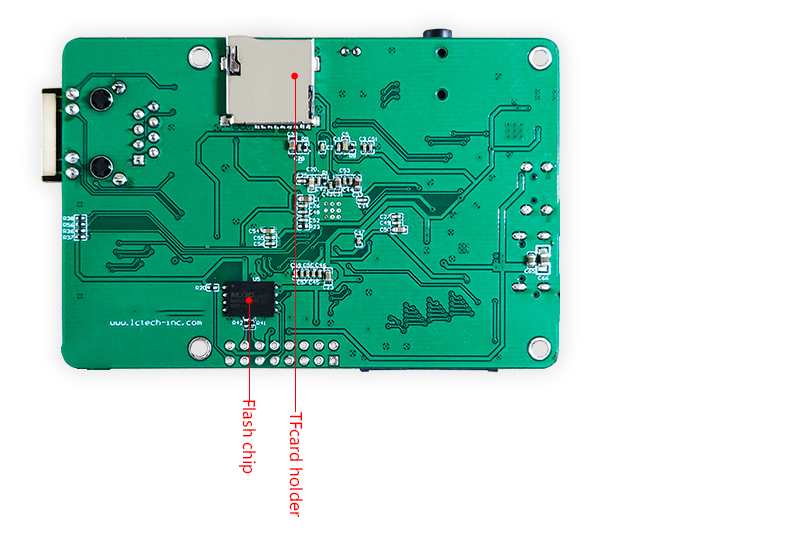
- ROM:Onboard 128Mbit SPI Nor Flash
- LCD:Onboard 480x272 LCD,universal 40pin interface
- WIFI:Onboard ESP8089
- Wired Network:100M Ethernet (contain EPHY)
- USB:OTG USB(microUSB)
- Camera interface:MIPI CSI 24pin interface
- Headphone jack,microphone,TF card holder
Test instructions
1.Program burning
(1)Decompress and install the burning tool

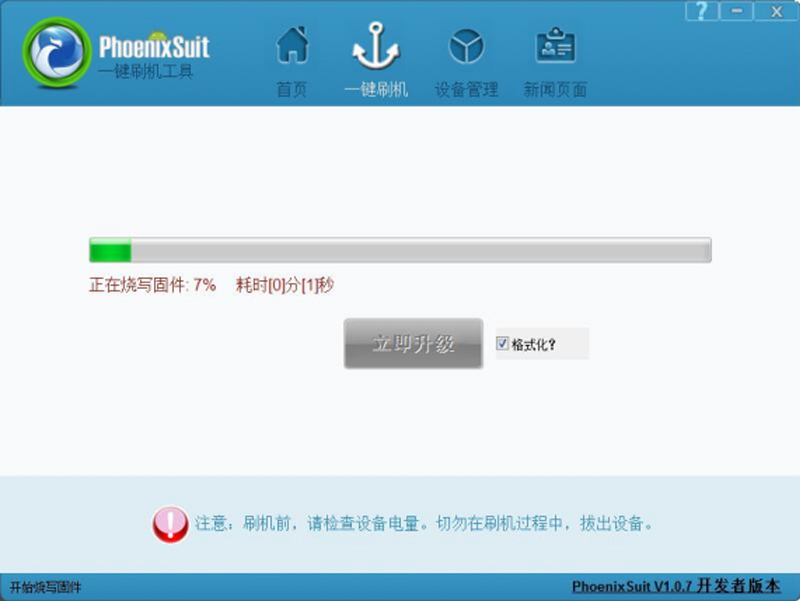
Burn: Open the installed PhonixSuit

Click "一键刷机" --> "预览" to select the img file to be burned and select format; then plug the USB cable into the OTG interface and connect it to the computer. Press and hold the S6 button and then press the RESET button. Release the S6 button and start burning
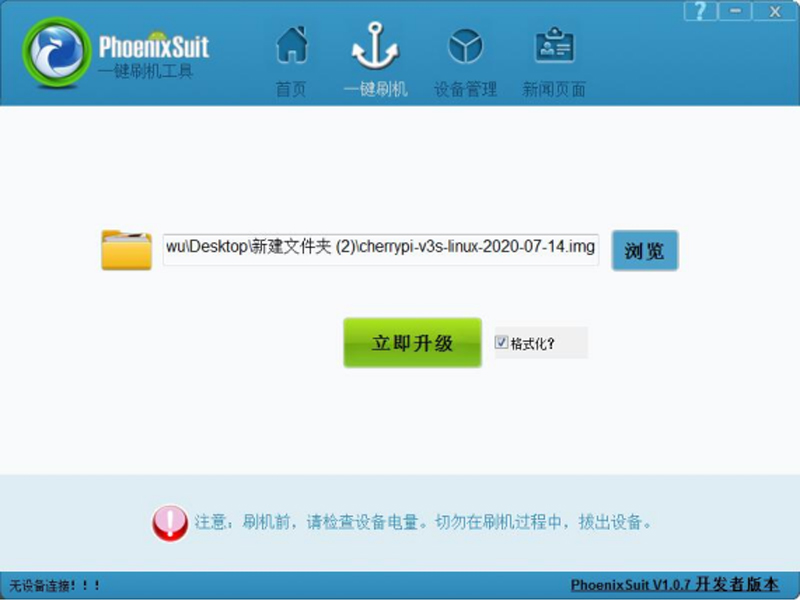
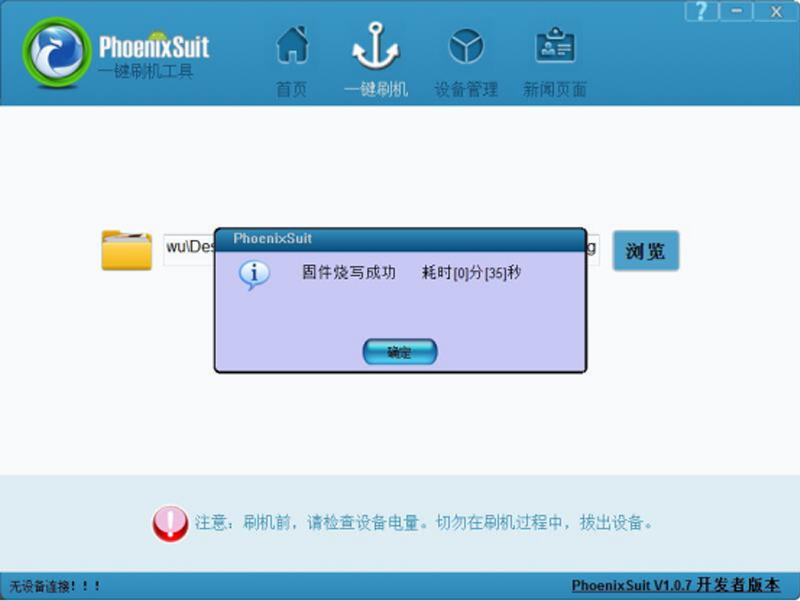
The burning time is about one minute, please be patient. The firmware is burned in Flash.
Function test
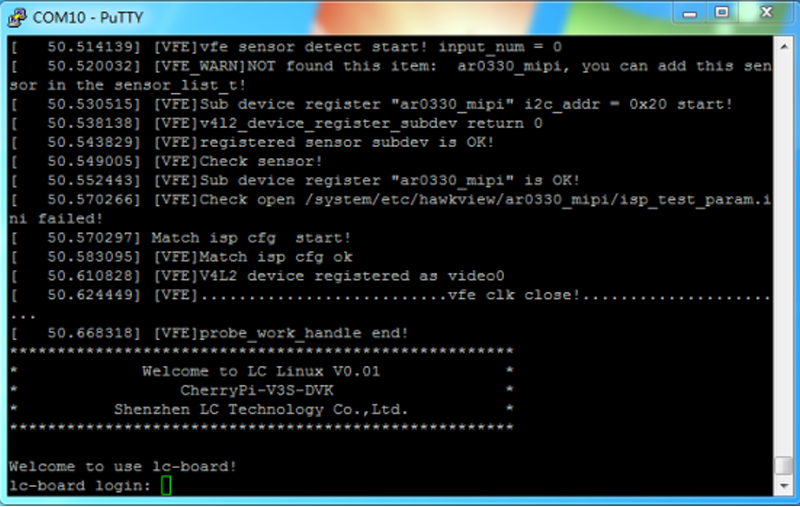
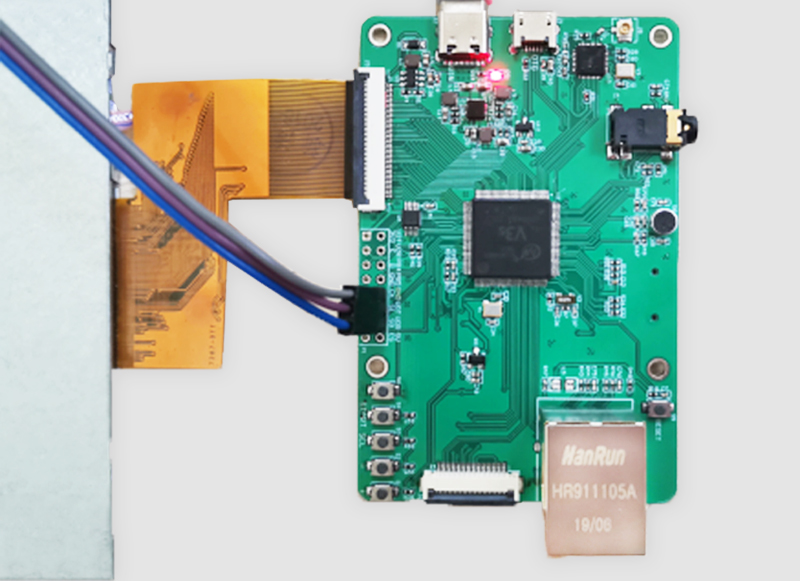
The device uses microUSB or type-c power supply,and then uses the usb to ttl module to connect to the U0T,U0R and GND pins,then open putty,and wait for the boot to complete
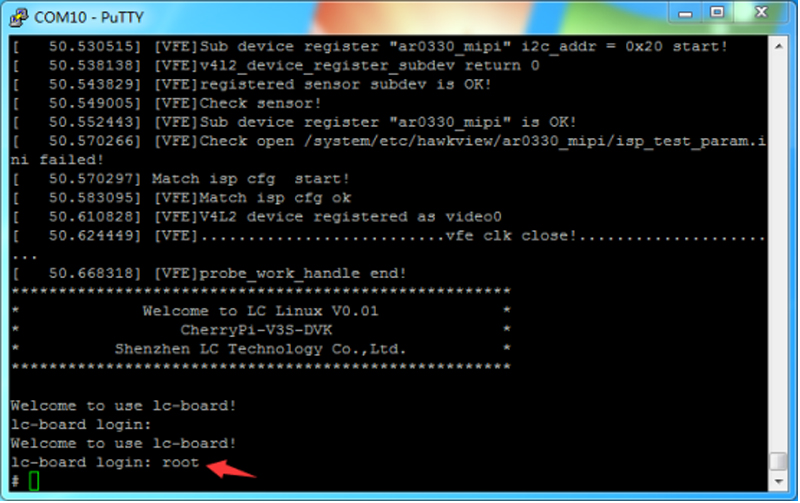
Login username, root password is empty
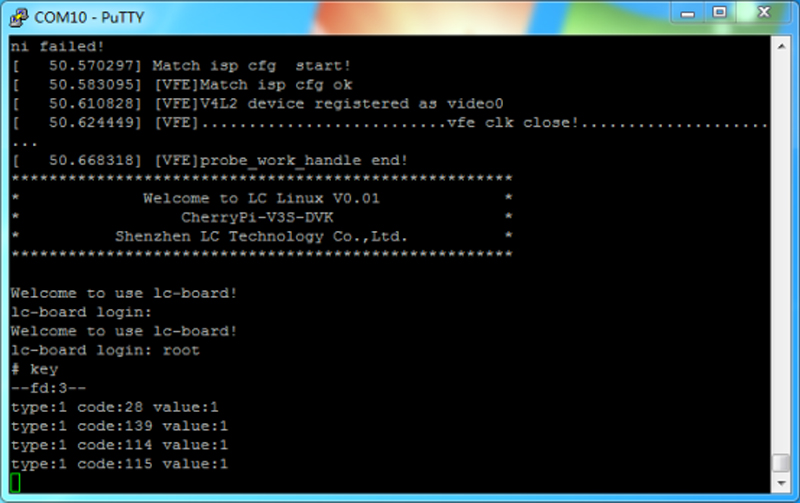
Next are the instructions for each function
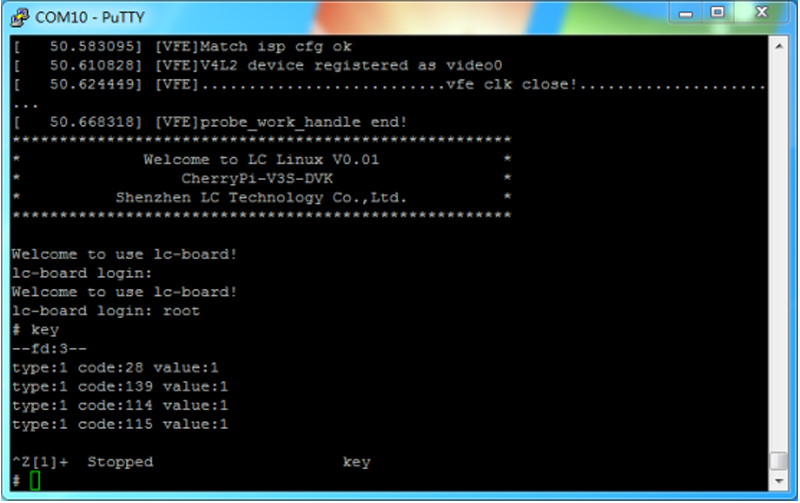
1.Button detection Enter key and press Enter,press S1 to S4 respectively to detect,press Ctrl+C to exit the key detection function,Ctrl+Z to pause
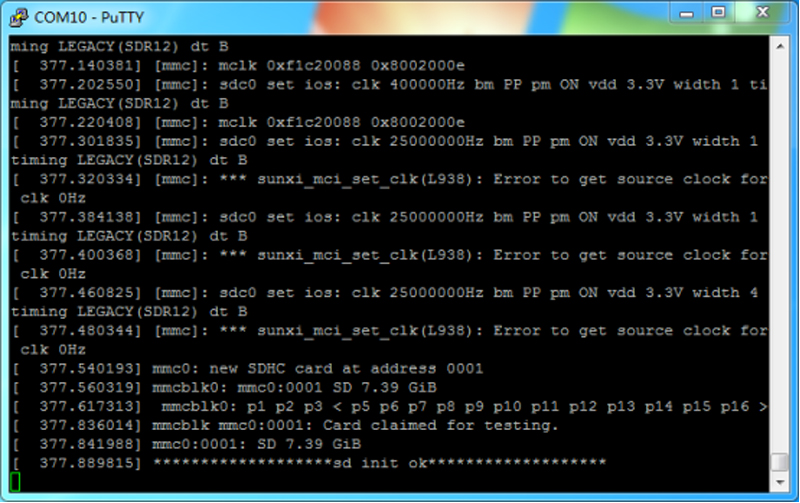
2.Insert the TF card into the TF card holder, and the serial port will return sd init ok
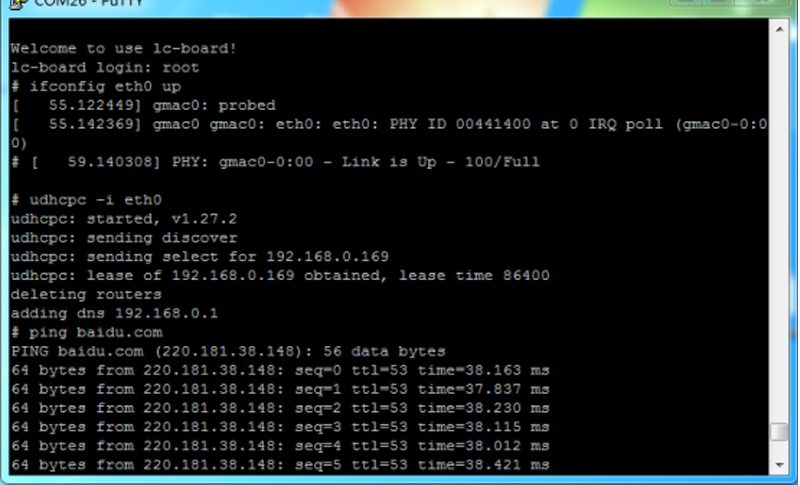
3.Wired network Plug in the network cable and enter ifconfig eth0 up and press Enter udhcpc -i eth0 and press Enter
After the network connection is successful, enter ping baidu.com and press Enter to test the Internet access function
4.Recording Enter cd /tmp and press Enter amixer cset numid=10,iface=MIXER,name='Audio main mic' l press Enter
arecord -d 3 -f S16_LE -r 16000 tmp.wav Press Enter, wait for "#" to display after recording, indicating that the recording is complete

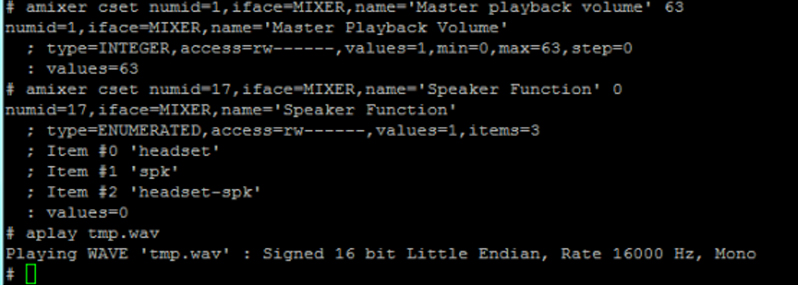
5.Audio playback amixer cset numid=1,iface=MIXER,name='Master playback volume' 63 Enter amixer cset numid=17,iface=MIXER,name='Speaker Function' 0 Enter
aplay tmp.wav Press Enter,plug in the headphone cable with 3.5mm plug or the playback device to hear the sound you just recorded
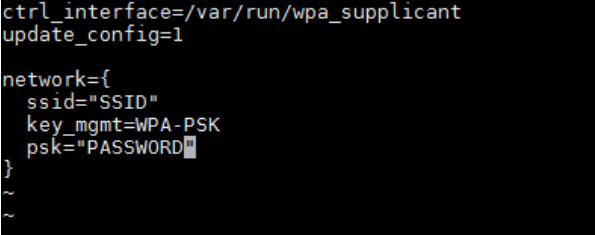
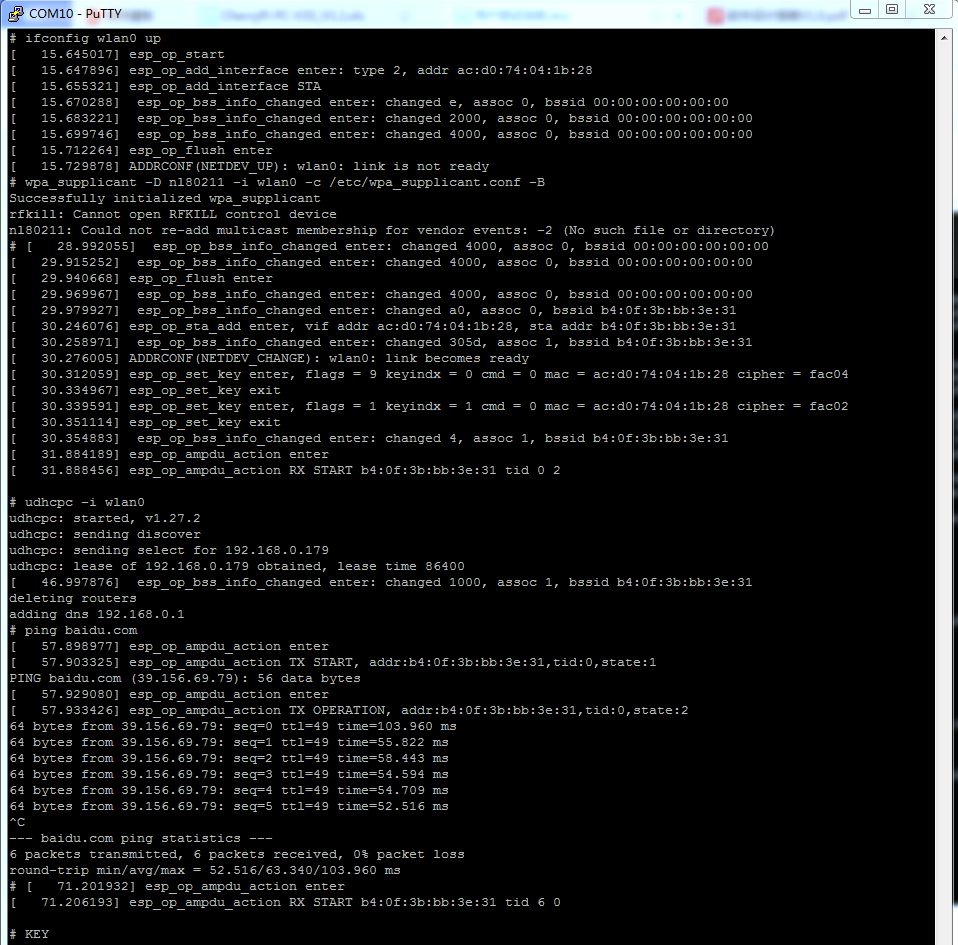
6.WIFI wireless network input ifconfig wlan0 up enter, then enter vi/etc/wpa_ Supplicant.conf Fill in the router's ssid and password
Then execute the wifi link command and get the dynamic ip through udhcpc to connect to the network wpa_supplicant -D nl80211 -i wlan0 -c /etc/wpa_supplicant.conf -B Enter
udhcpc -i wlan0 Enter ping baidu.com Enter
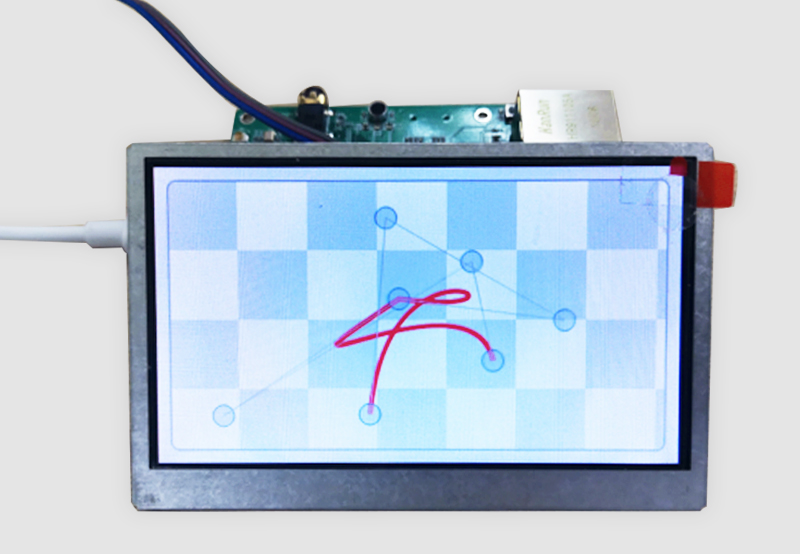
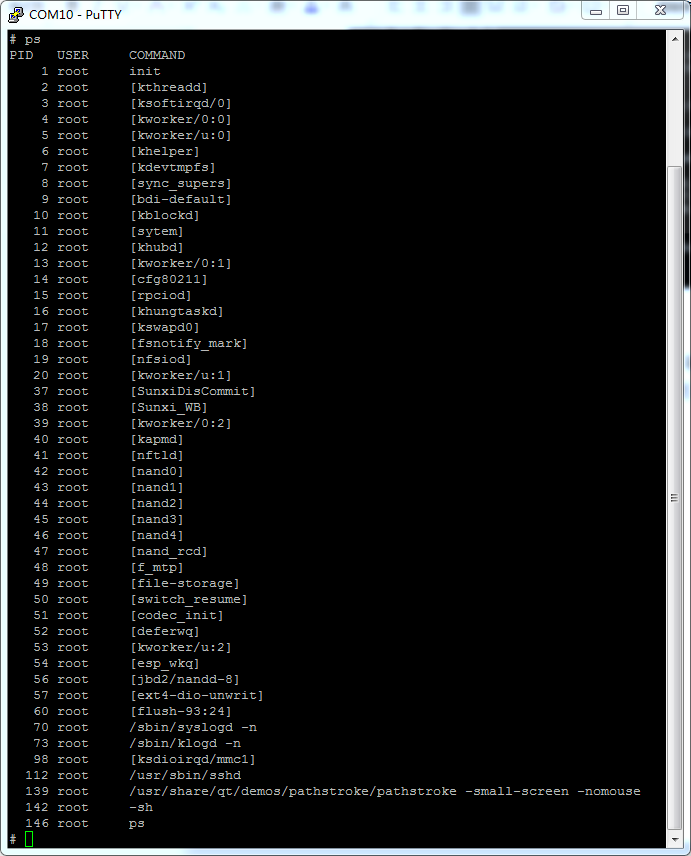
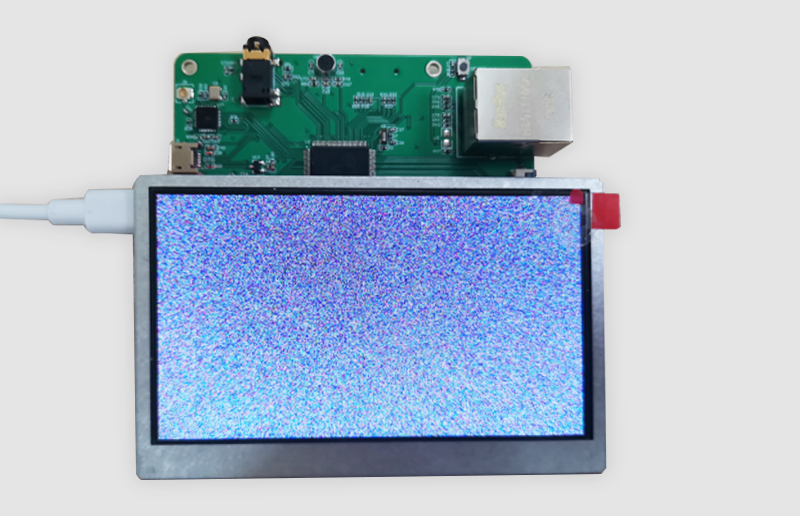
7.The screen is full of random color dots. Before executing the command that the screen is full of random color dots, kill the application process of pathstroke. Enter ps and press Enter. You can see many processes. For example, pathstroke is the 139th,you can enter Kill 139 Enter the end (it is not necessarily 139 every time you restart the device),the circle on the display stops moving
Finally, enter cat/dev/urandom>/dev/fb0 Enter
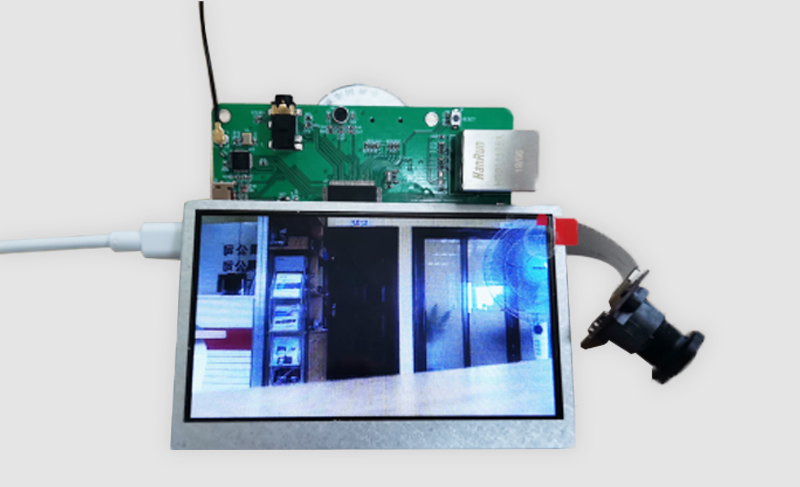
8.Camera If the pathstroke has not been killed,you need to kill the AR0330 camera before opening the camera command,reset the device,wait for the boot to complete the root login and enter demo-camera Press Enter,and the image can be seen on the display
Instructions for use LcPiTester_V3S soft
The following is the test method using Putty general software. For customers who want to speed up the test,they can use the V3S special test software developed by LC Technology,as shown in the figure below:
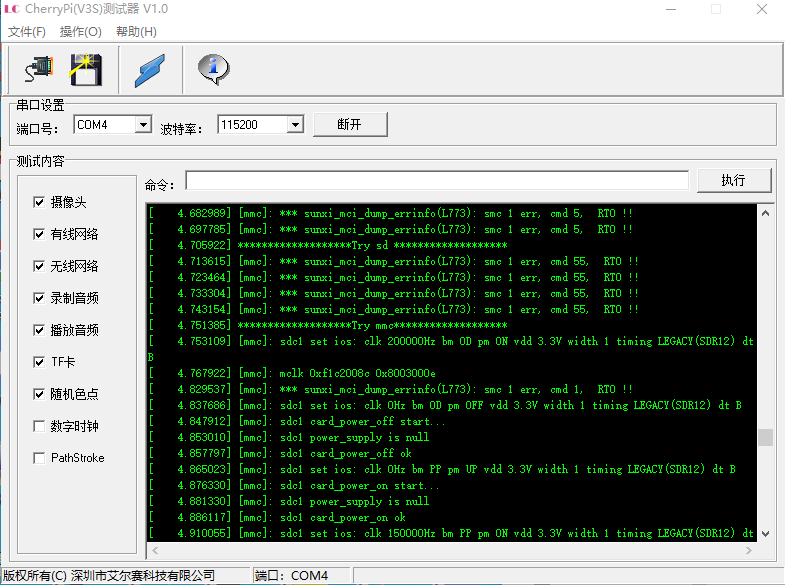
Instructions for use:
1.Connect the peripherals that need to be tested (such as LCD),connect the serial ports (GND,U0T,U0R),and supply power to the board
2.Select the correct port number,baud rate 115200,click "连接",and a lot of debugging information will be printed out in the window at this time. After the system startup is complete,click "断开",and then click "连接",and the following information will appear Log in to the Linux system successfully,and the function test can be performed

Remarks: The software only supports ports within COM9. If the port number recognized by the computer exceeds COM9,please modify the port number in the Windows Device Manager.
Take the test LCD as an example:
1.Check "随机色点",click "执行",if the test is successful,the LCD will be covered with random color dots
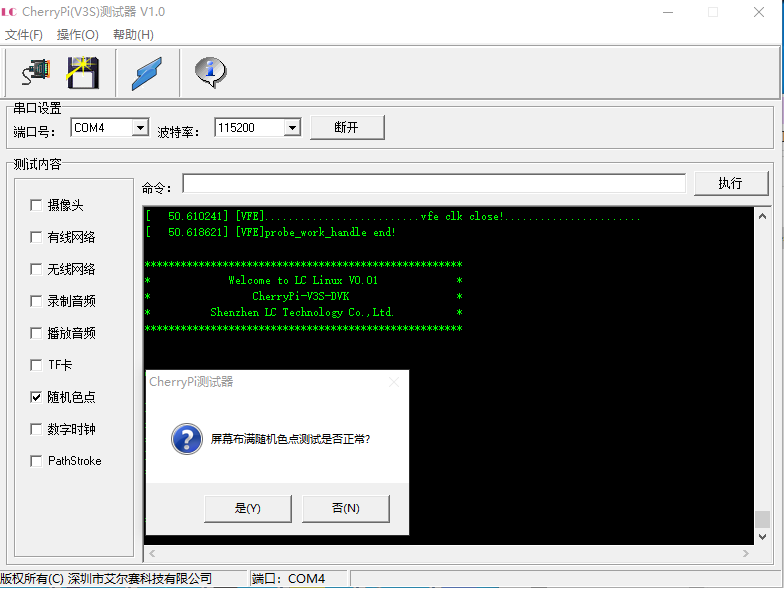
2.At this time,the software will ask whether the test is successful. If you click "是",the random color point will display green![]() otherwise it will display red. The test method for the rest of the functions is similar to this
otherwise it will display red. The test method for the rest of the functions is similar to this
Source code compilation
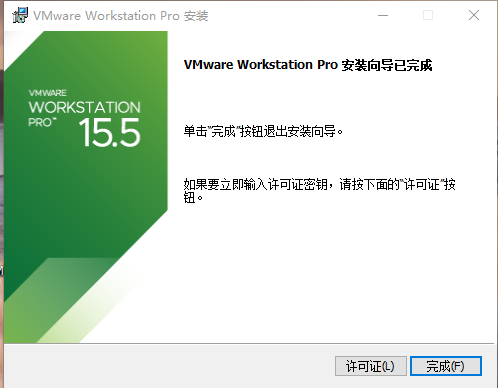
1.Install the virtual machine VMware Workstation (in the sn.txt in the activation code installation package)
2.Unzip the CherryPi_V3S-Build-2020-07-14.7z file
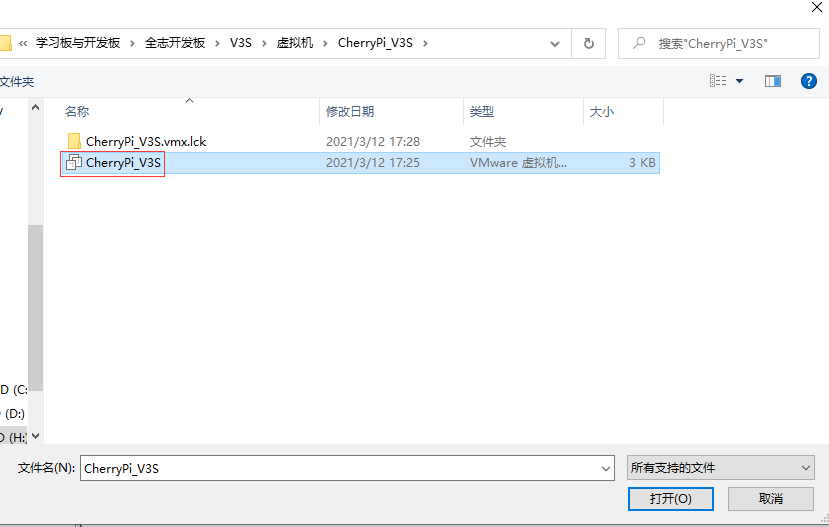
3.Open the installed VMware Workstation software, click "Open Virtual Machine", and locate the newly decompressed the CherryPi_V3S.vmx file in the folder CherryPi_V3S is enough.

4.Then click the green play icon on the left or in the menu bar "Start this virtual machine"
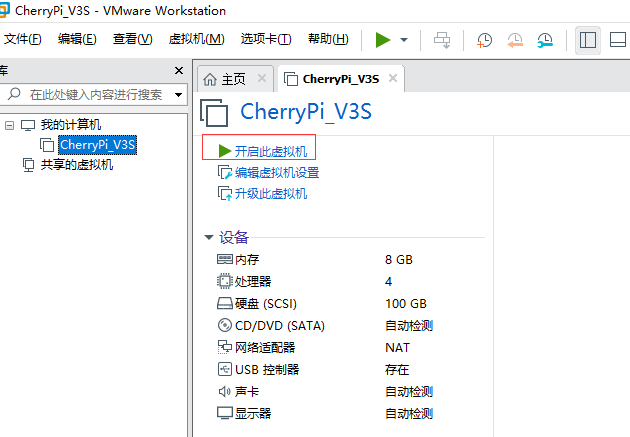
Remarks:
The processor parameters here may need to be changed according to the computer parameters you actually use, such as a 4-thread CPU,Then the parameter behind the processor is changed to 4.
The interface after entering is as follows
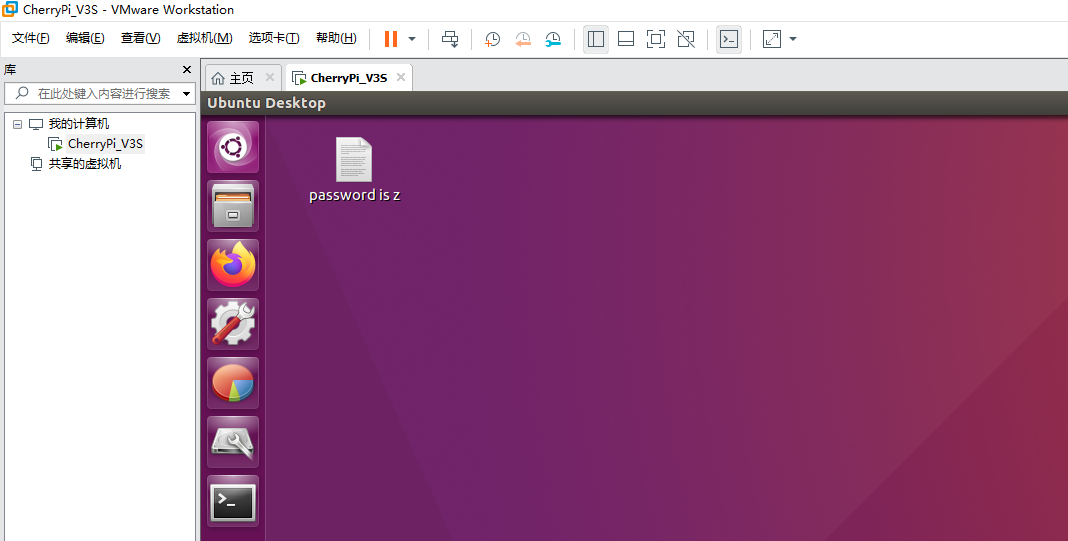
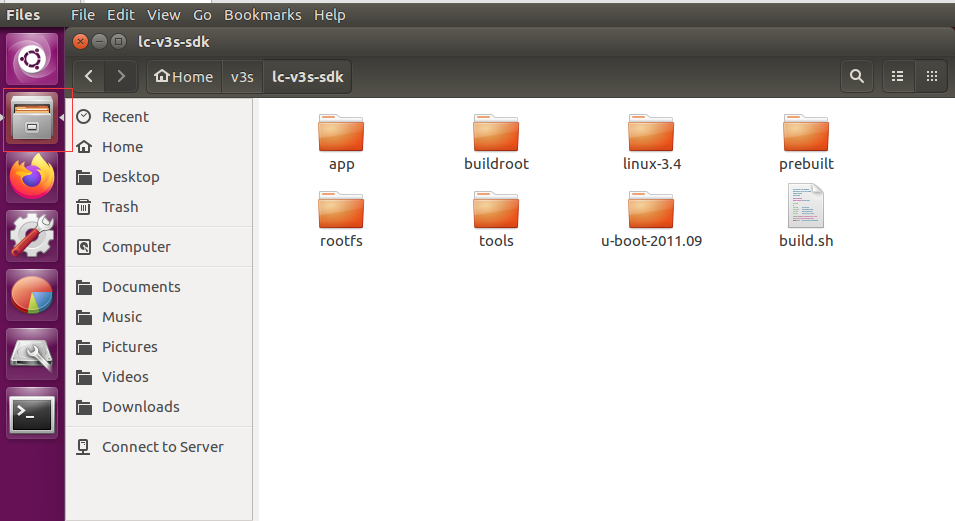
5.Click the folder icon, enter Home-->>V3S-->>lc-v3s-sdk
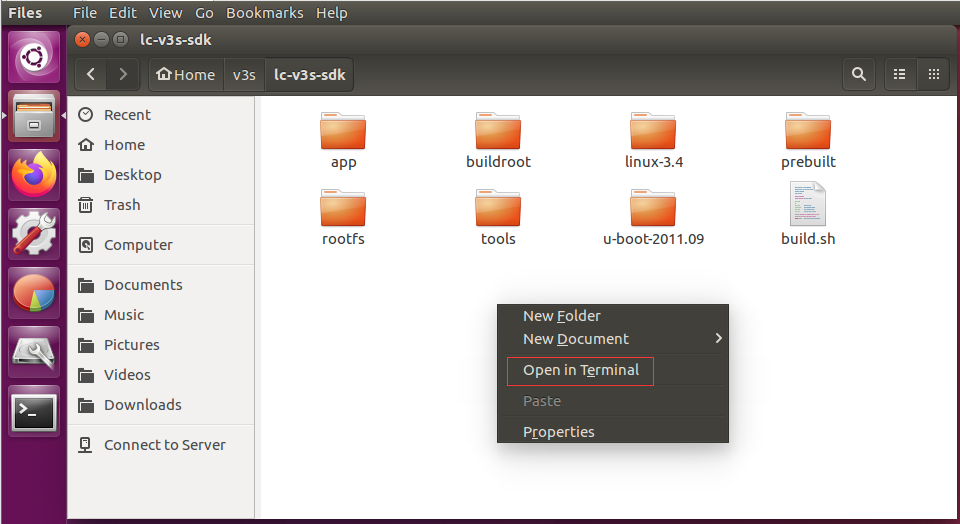
Right-click in this folder and click "Open in Terminal"
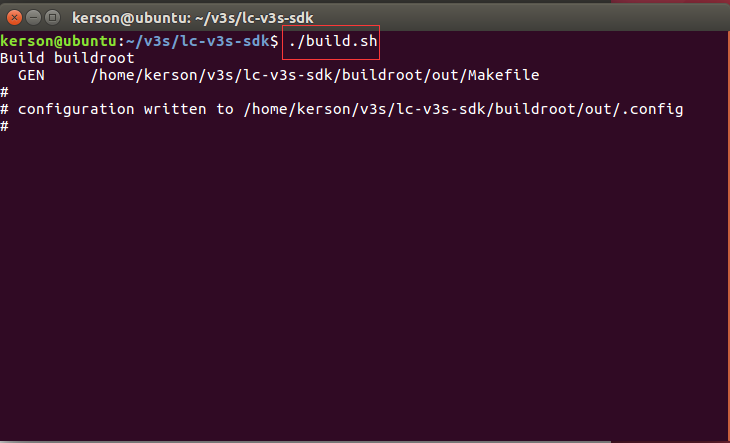
6.Enter ./build.sh and press Enter to compile the V3S source code
Download LCPI-V3S user manual
For more information on the use of LCPI-V3S, please clickGoogle Drive Link
