LC-AI-C108
Product name
RPI_AC108 audio decoding module 4 microphone voice module
Overview
Aire AC108 module is equipped with X-POWER audio decoding chip and 4-channel silicon microphone array.
Audio sound card expansion board specially designed for Raspberry Pi, low power consumption, stereo codec, support high-quality voice capture. It can also be used for DIY similar to smart speakers such as Tmall Genie and Google Assistant.
Features
- Based on Raspberry Pi 40pin interface, suitable for Raspberry Pi series motherboards
- Support Raspberry Pi Zero/Zero W/2B/3B/3B+/4 and other development boards
- Using AC108 low-power stereo codec chip, can communicate through I2S interface
- Onboard 4 high-quality MEMS silicon microphones, which can record left and right channels
- Onboard 12 programmable APA-102-2020 full-color LEDs
- Power supply mode: plug into the Raspberry Pi to get 5V and 3.3V power
- Logic voltage: 3.3V
- Raspberry Pi control interface: I2C, audio interface: I2S, Raspberry Pi controls the microphone array to capture voice through the I2C interface, and then transmits the voice signal to the Raspberry Pi through the I2S interface, and finally the 3.5mm headphone socket of the Raspberry Pi / HDMI interface output audio
- Provide complete reference materials, with Raspberry Pi, you can DIY smart speakers similar to Tmall Genie, Xiaodu Speakers, and Google Assistant.
Introduction
1. Board size: 65*65mm, weight: 20g
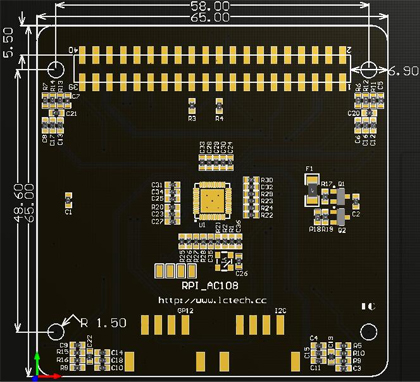
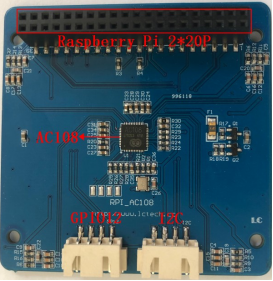
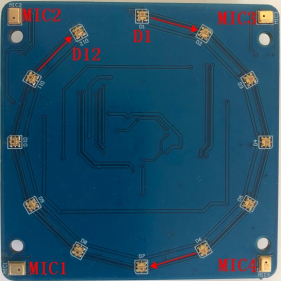
(1)MIC1--MIC4: 4 analog MEMS silicon microphones
(2)D1--D12: 12 APA102 full-color LEDs, connected to the SPI interface of the Raspberry Pi
(3)Raspberry Pi 2*20P socket: support Raspberry Pi Zero/Zero W/2B/3B/3B+/4 etc
(4)AC108: Highly integrated four-channel ADC with I2S/TDM output conversion function
(5)GPIO12: Grove digital port, connected to GPIO12 and GPIO13 of Raspberry Pi
(6)I2C: Grove I2C interface, connected to I2C-1 of Raspberry Pi
Hardware connection
1.Preparation
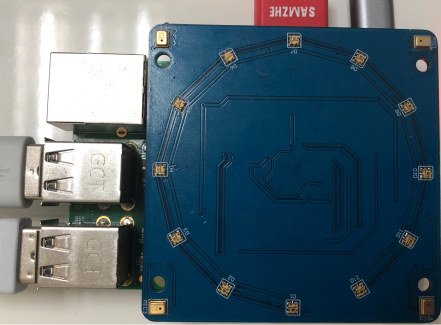
(1)First make sure that the Raspbian operating system running on the Pi is updated on or after 2018.06.27, then insert the WM8960 module into the Pi, connect the necessary peripherals such as the keyboard and monitor, and connect the Pi to the WiFi/wired network, as shown in the figure below :
(2)Change source
Before installing the driver, please switch the source to Tsinghua according to the following process:
①Input: sudo nano /etc/apt/sources.list

②Use # to comment out the content of the original file and replace it with the following content
deb http://mirrors.tuna.tsinghua.edu.cn/raspbian/raspbian/ stretch main non-free contrib
deb-src http://mirrors.tuna.tsinghua.edu.cn/raspbian/raspbian/ stretch main non-free contrib

After inputting, press Ctrl+X to save and exit
(3)Download and install the driver
Enter:git clone https://github.com/respeaker/seeed-voicecard.git #Download driver
Enter:cd seen-voicecard #Open folder
Enter:sudo ./install.sh #Install sound card driver
Enter:sudo reboot #Reboot Pi

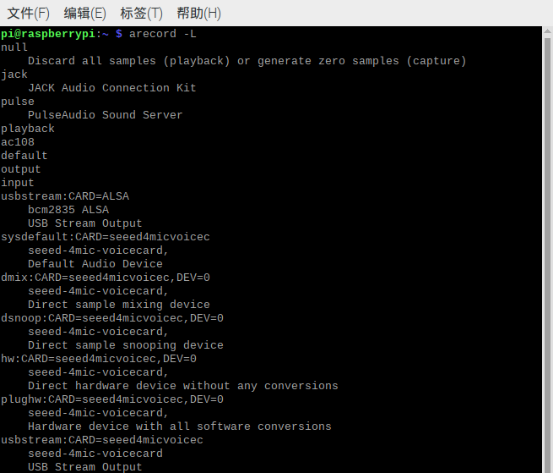
(4)Check whether the sound card name matches the source code seeed-voicecard
Type: arecord -L
2.Install Python and virtual environment
This is to isolate the relationship between the SDK and the system Python package
Enter: cd /home/pi
Enter: git clone https://github.com/respeaker/4mics_hat.git
Enter: cd /home/pi/4mics_hat
Enter: sudo apt install python-virtualenv #Install Python2 virtual environment
Enter: virtualenv --system-site-packages ~/env #Create a virtual environment, named env
Enter: source ~/env/bin/activate #Activate virtual environment
Enter: pip install spidev gpiozero #install required toolkit

3.Example of controlling APA102 LED
(1)APA102 LED interface configuration
The onboard APA102 LED is controlled through the Pi's SPI interface, so the Pi's SPI interface needs to be configured first.
The steps are as follows:
●Enter: sudo raspi-config
●Select "SPI"
●Select "Yes"
●Select "OK"
●Select "Finish"
(2)Run APA102 LED
Enter: cd /home/pi
Enter: git clone https://github.com/respeaker/4mics_hat.git
Enter: cd /home/pi/4mics_hat
Enter: sudo apt install python-virtualenv #Install Python virtual environment
Enter: virtualenv --system-site-packages ~/env #Create a Python virtual environment
Enter: source ~/env/bin/activate #Activate Python virtual environment
Enter: pip install spidev gpiozero #install spidev and gpiozero

Enter: python pixels.py #Run APA102 LED, the LED will blink
![]()
4.Alexa SDK and DuerOS SDK
Since Google Assistant cannot be logged in in China, Alexa and Baidu DuerOs, which can be connected in China, are used as voice engines to develop a voice mutual assistance system that can be used by most people.
(1)Configuration and DOA test
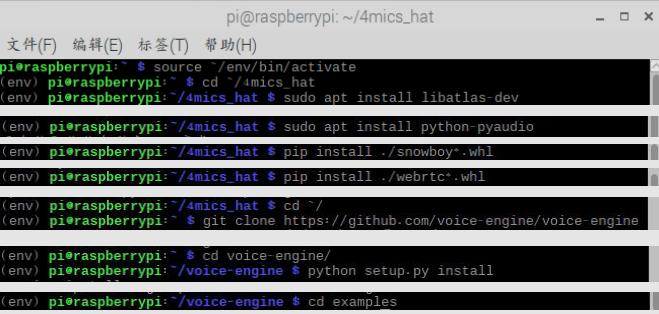
①Configure voice engine
Enter: source ~/env/bin/activate #Activate Python virtual environment
Enter: cd ~/4mics_hat
Enter: sudo apt install libatlas-base-dev #install snowboy depend
Enter: sudo apt install python-pyaudio #Install pyaudio audio processing package
Enter: pip install ./snowboy*.whl #install snowboy for KWS
Enter: pip install ./webrtc*.whl #Install webrtc for DOA
Enter: cd ~/
Enter: git clone https://github.com/voice-engine/voice-engine #write by seen
Enter: cd voice-engine/
Enter: python setup.py install
Enter: cd examples
(2)Running
Run python kws_doa.py in the virtual environment. Please use snowboy to wake up, we can see the location information.

5.Baidu Chinese voice interaction/Alexa English voice interaction
(1)Configuration and installation related dependencies
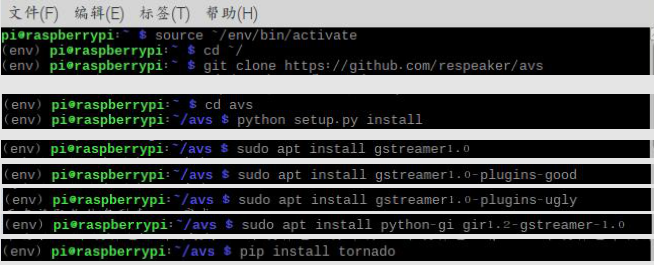
Enter: source ~/env/bin/activate #activate the virtual
Enter: cd ~/
Enter: git clone https://github.com/respeaker/avs
Enter: cd avs #install Requirements
Enter: python setup.py install
Enter: sudo apt install gstreamer1.0
Enter: sudo apt install gstreamer1.0-plugins-good
Enter: sudo apt install gstreamer1.0-plugins-ugly
Enter: sudo apt install python-gi gir1.2-gstreamer-1.0
Enter: pip install tornado
(2)Obtain authorization
Run alexa-auth on the terminal, and then log in to obtain authorization from Alexa, or run dueros-auth to obtain authorization from Baidu. Authorization files will be automatically saved in
/home/pi/.avs.jason. In China, it is usually enough to obtain Baidu's authorization, the method is as follows:
①Input: dueros-auth
![]()
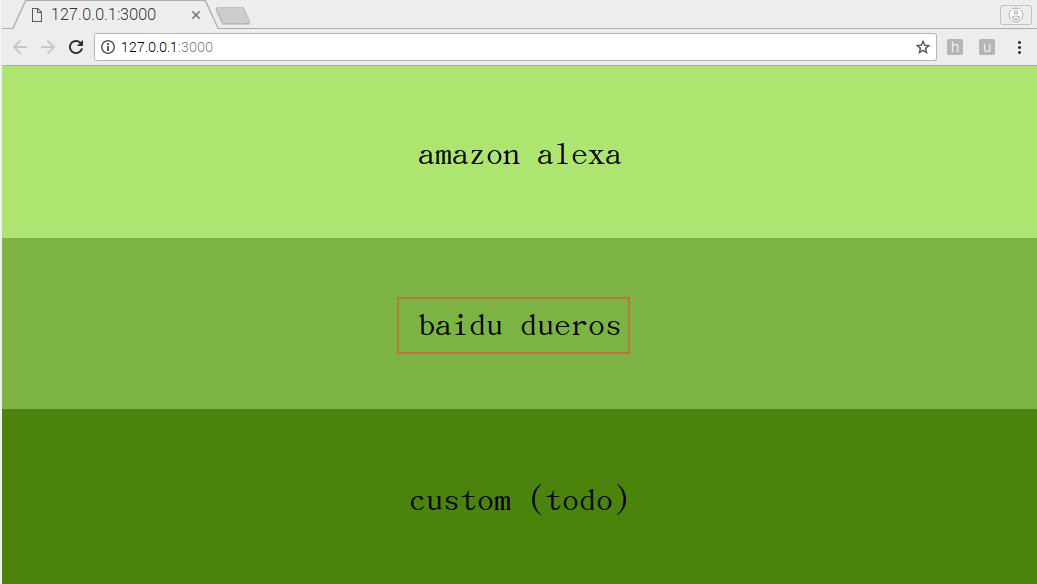
②Select baidu dueros, and then enter your own Baidu account to complete the authorization
Note: If you want to switch between alexa-auth and dueros-auth, please delete /home/pi/.avs.jason first. This is a hidden file, please use ls-la to display the file
(3)Install mpg123 player
Raspberry Pi has 3 players (mpv, mpg123 and gstreamer) available, and mpg123 has a good performance in voice interaction.
Input: sudo apt install mpg123 #Install mpg123 player
![]()
6.Baidu Chinese voice interaction test
Plug the earphone/speaker terminal into the 3.5mm audio interface of the WM8960 module to connect to the speaker (if the monitor used has HDMI audio function, it will give priority to output audio from HDMI).
After the above steps are configured correctly, you only need to enter the following 3 commands to enter the voice interaction function.
Input: cd /4mics_hat #Open folder
Input: source ~/env/bin/activate #Activate virtual environment
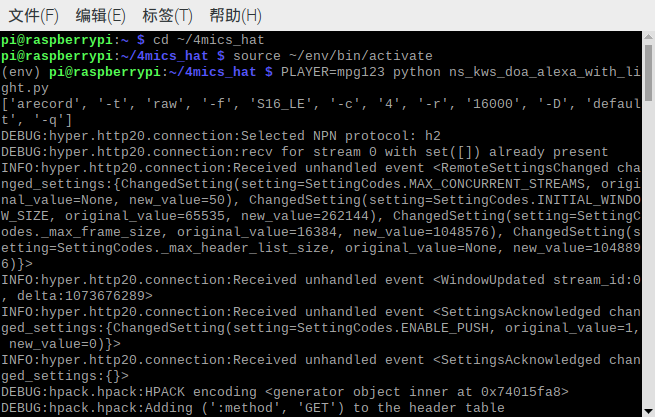
Input: PLAYER=mpg123 python ns_kws_doa_alexa_with_light.py
![]()
Then the terminal will print a lot of debug information. When we see status code: 204, say snowboy to the microphone on the WM8960 module to wake up the voice interaction function. The WM8960 voice module successfully recognizes
Snowboy will print out a lot of debugging information after this sentence (if snowboy is not recognized, no debugging information will be output), at this time, immediately say the operation you want to perform, for example: play Jacky Cheung's song, and the intelligent voice module will play it immediately Jacky Cheung's music.
(Hint: The word snowboy may be more recognizable when pronounced by mobile phone translation software than by mouth)
7.APA102 LED test
After the above steps are configured correctly, you only need to enter the following 3 commands to test the LED function.
Enter: cd ~/4mics_hat #Open folder
Enter: source ~/env/bin/activate #Activate virtual environment
Enter: python pixels.py #run LED

8.WM8960 module output volume adjustment
The volume adjustment button on the Raspberry Pi desktop is used to adjust the volume of the built-in sound card by default. To adjust the volume of the WM8960 module, you must first set the WM8960 module (seeed-2mic-voicecard) as the default sound card.
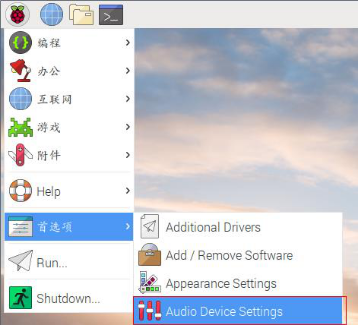
(1)Click Preferences---Audio Device Settings
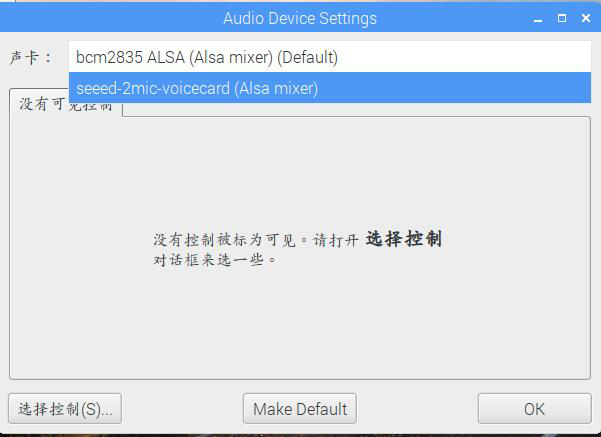
(2)Sound card: seeed-2mic-voicecard (Alsa mixer), then click Make Default and OK
Kind tips:
1. When the environment has been configured, you only need to execute the 7th and 8th steps above to test the voice interaction function and APA102 LED at the next boot;
2. Because many files in the configuration process need to be downloaded from overseas Github/Raspberry official website, the speed may be slow, please wait patiently, if the download fails, you can try multiple times!
